Welcome to Creative Memories Halloween Blog Hop!
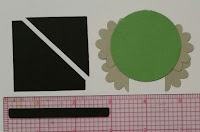
Have you bought Creative Memories tools and just don't know how to incorporate them into more than just what the punch is? In this blog post I'll encourage you to use your tools to make Halloween pages. First, let me show you how to make a witch for your page. I took the shape maker system and cut out a black square from Shades of Neutral paper pack, which we'll use for the hat and a green circle for the head base using Shades of Bright Designer Paper pack. Using the Blossom Place punch and Shades of Neutral, cut out two gray blossoms. Take the two blossoms and cut them in half. This will be the witches hair. Cut the black square per photo to make the witches hat. Use a scrap piece of black to make the brim of the hat. Then use the bubble border maker cartridge to cut out circles for the nose and eyes.
For the "Cauldron", I cut out a black circle for the pot. For the legs, I used the tag maker, punch out a black tack and trim with scissors to look like legs. Using the Blossom punch, cut out two white blossoms and one green. Layer the blossoms behind the circle to look like it's boiling. I again used the Bubble maker punch to make bubbles on outside of pot. Take the left over piece of black to make the rim of the pot. I used Silver Metallica pen to add detail to pot.
The ghost was super easy! I used the shape maker and cut out one black square, if you want the shadow, and one white square. Take the white square and place in the blossom punch to create the bottom jagged edge. Then use the corner rounder to round the top of the squares. I used the bubble border maker cartridge to make the eyes.
All of the title words
WITCHES, SPELLS, BOO!
were cut from this sheet of paper from the Halloween, Trick or Treat paper pack!
Isn't it BOOutiful?
Isn't it BOOutiful?
Dracula is a bit more involved. Take the shape maker and cut out a black square, a black circle, and two white circles. These will be used to create your base. Take the black circle and using the circle punch cut away part of it to make U shape for the cape. Then do the same with the white circle to make ears. Place these two pieces on the black square and then place the white circle on top making the face. Use the picket fence border maker cartridge and punch out white teeth and nose. Then again for eyebrows. For the outer eyebrow, I took inside negative space from black picket fence border cartridge and cut it diagonally. For the black and red for "smile" I cut from the circle punch, layered and then trimmed it to get the look. For the eye's I used bubble maker cartridge.
You'll LOVE the graves! They are so SIMPLE to make! Take the shape maker system and cut out 3 gray squares. The using the NEW corner rounder, insert the top corners into the notch side. Do this for both sides of top. Take your Black Dual-Tip Pen and write whatever you'd like. I used a black ink pad to distress the sides of the paper to look more realistic. If you don't have ink, you can achieve this look with your Black Dual-Tip Pen and a make-up sponge. Color on sponge with the pen and then wipe it on card stock.
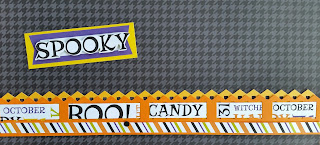
I recently received the new 12 x 12 Eggplant Fast 2 Fab and challenged myself to use this album to incorporate it with these elements to create a personal looking album with the ease of the pre-designed pages. The Spooky fence I did in past blog post Film Strip Fences. The candy corn border on right side of the page, I made by cutting out a orange, yellow and white picket fences and layered on top of each other and trimming off.
 This is a super quick easy border. Using the Border Maker system and Picket Fence Cartridge, I cut out a orange and yellow border using Shades of
Bright paper pack. Use the Halloween "Trick or Treat Paper Pack" and cut out strips of words to weave through the orange strip. The mount the orange strip staggered on a yellow strip. Then cut a 3/8" strip of stripes. For the SPOOKY tag, I cut out the word from the Trick or Treat Paper and used foam squares found under the Going Gone Tab, to pop up the word and mounted it on the tag. I used the purple journaling block from 9-square sheet as one of the squares has three of these "tags" on it.
Thanks for "hopping" over to my blog from Julie's blog blog now hop over to Lisa's Workshop blog at http://www.lisasworkshop.blogspot.com for more Spooktacular Halloween Ideas.
After you’re done visiting all the stops be sure to visit
the CM Blog & leave a comment for a chance to win some fun treats
(no tricks)!
If you want more ideas, follow my fellow CM Advisors'.
They have some Tricks and Treats on their pages.
Check them out at:Hop 1 Sarah Fitzgerald
Hop 2 Julie Tambrini
Hop 3 Candace Bouldin, your HERE!
Hop 4 Lisa Graham
Hop 5 Fran Smitherman
Hop 6 Diana Brinsley
Hop 7 Stefani Jones


13 comments:
Love the Candy Corn border!! So clever!!
Love these ideas!!! Thank you for sharing!
I love using my tools, thanks for the ideas!
I always love getting more ideas on punch art. These are just GREAT!! Thanks for sharing :-)
I love your little tombstones--so clever!!
Great ideas! I especially love the cauldron and tombstones. All you need in your cauldron now is a few green toads/frogs from the (long ago) Meadow Maker hopping out of it!!
Wow-your adorable images are too cute! Thanks for sharing your detailed instructions, too.
Cute. I like the ghost
Very cute ideas!
This is fantastic! Dracula is wonderful and I love how you made the witch using the Creative Memories Shape Maker System.
OMG! Thank you SO much for showing us how to make embellishments with the different tools! I love them! I can follow a 'pattern', but it's very difficult for me to come up with things on my own. Love your layout! Absolutely Spooktacular! (kinda cheesy, I know, but it is!)
great ideas and ways to use my tools that I already have thank you
I love the tombstones - so simple, yet so cute! Nice job!
Post a Comment