Wednesday, August 12, 2015

Calling all Disney Lovers!


Are you a Disney Lover?  Always looking for new way to add embellishments to your page so it has a fresh look? Well wait no longer!! 

Today I created this cute border with Creative Memories Border Maker System.

I used the  Picket Fence Cartridge comes with system and cut edges of red 12x12 paper.
Then I took the Bubble Border Maker Cartridge cut out the border and then used 1/4" hole punch to cut out and make ears in red bubble border.

This is piece I cut off

Line cut on magnetic
strip like this.

 Last I used the Filmstrip Border Maker Cartridge you'll need to cut a piece of white paper into 2 1/2" strip, cut border and then trim off outer edge and bracket off.

Place dots side piece of paper in system on edge of 
magnetic strip cut out border.


now for these amazing products!


Like us on FACEBOOK - Scrapin Jpegs


Monday, August 10, 2015

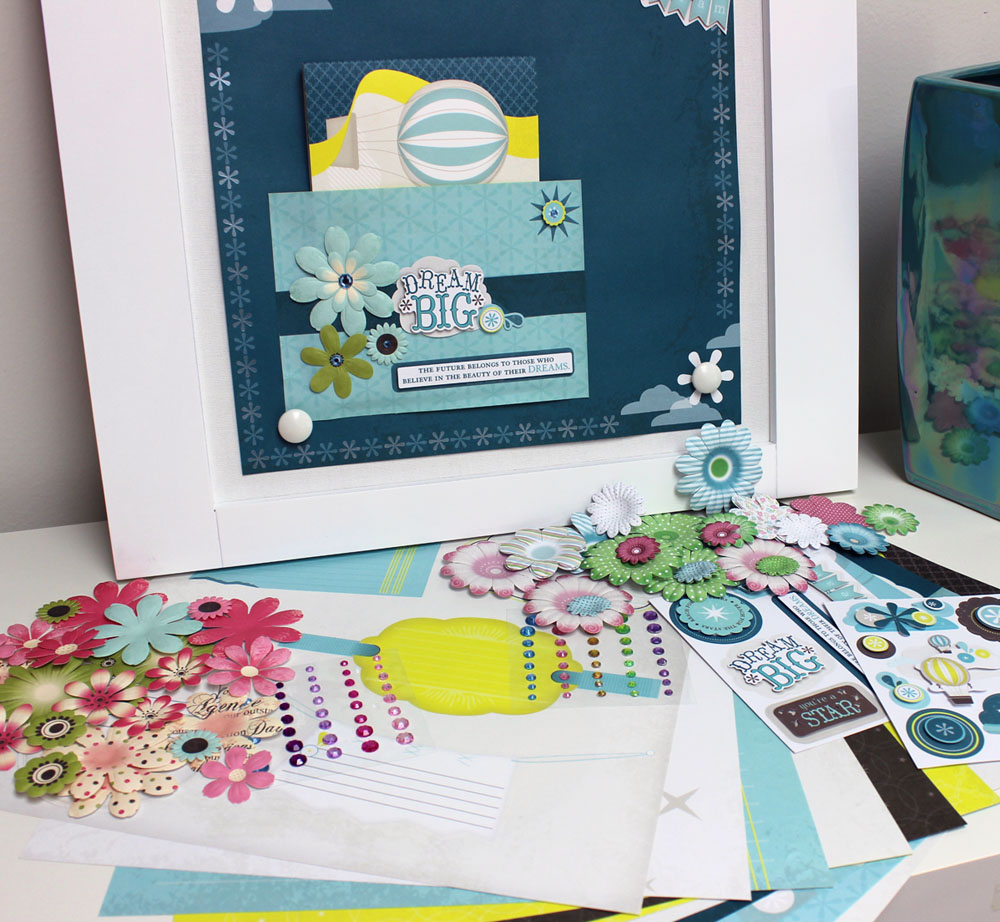
Dream BIG Promotion with Creative Memories


Dream BIG Promotion ~ August 11-18


Your gonna LOVE this!!

Starting tomorrow (Tuesday, August 11th, 2015 at 9 a.m. CT), with each $100 order, you will receive over $25 in dreamy FREE products!

The Dream Big free gifts include:
• Pastel Embellishment Pack (30 paper flowers and 40 gems)
• Dream 12x12 Specialty Paper Pack (11/pk - 8 different double-sided designs with shimmery accents, 2 double-sided die-cut pages and 1 sheet of die-cuts)
• Dream Layered Stickers (2/pk)


To redeem:
• When the retail product total reaches $100, you will see a large notice and image when you visit the View Cart page.
• Click on Add to Cart to have the free gift applied to your order.
• You will see the collection of free gifts included with the other products in your Cart, showing a price of $0.00

Go to my website www.creativememories.com/user/CandaceBouldin


This would be a good time to stock up on your albums needed? Tell me what you think of the sale?

One free gift per ORDER. Customers may place as many qualifying orders as they wish during the promotion period. Promotion ends 11:59 p.m. CT Tuesday, August 18. Substitutions of equal or greater value may apply. 

 
#ScrapinJpegs #CandaceBouldin #CreativeMemories #DreamBigPromotion #Sale


Place an order of $501 you can get this all this FREE and your shipping would be FREE too! 
  • Sleek White EveryDay Magnetic Display (+ six white magnets)
  • Dream 12x12 Specialty Paper Pack (11/pk)
  • Dream Layered Stickers (2/pk)
  • Dream Big Simply Said Book
        PLUS two flowers & rhinestones packs!

  • Pastel Embellishment Pack (30 paper flowers, 40 gems)
  • Spring Flower & Sparkle Embellishment Pack (36 paper flowers, 40 gems) 

 CLICK HERE to shop now

Sunday, August 9, 2015

Mickey Mouse borders using Creative Memories Border Maker System


Friday I got the new bubble maker cartridge in the mail and today I got to play with it and a couple other of my tools.  I love all the concepts added together.  How about you?  Do you see adding these punches to your collection??

#ScrapinJpegs #CandaceBouldin #CreativeMemories #BorderMakerSystem

Shop here for the Border Maker System and Cartridges and Neutral Paper Pack


Tools Used:
-Creative Memories Border Maker System
-Filmstrip Border Maker Cartridge
-Bubble Border Maker Cartridge
(Used 1/4" hole punch to cut out and make ears in red bubble border)
-12-inch Rotary Trimmer with Deckle blade to Make trim at bottom of border
  and then make red strips
-Creative Memories Neutral Paper Pack

Thursday, August 6, 2015

Film Strip Punch from Creative Memories meet Hollywood!

Oh I'm so excited I got the new filmstrip punch in and I got to play with it!! <3 
It worked so great for our trip to Hollywood Blvd.  I used the Neutral Paper Pack and some older CM gold paper (I hope they bring back)  I took the Filmstrip punch in CM border maker to make the border on top and bottom and then took cut out the space behind the photo's to give me the black and white striped paper to mat the pictures with and fill in the filmstrip border with every other one. I used the filmstrip punch to punch the top and the bottom of the photos to make them look a negative.  I use the old CM star punch for little stars and used the Cricut to Plantin SchoolBook to cut larger stars.


Supplies needed:
Neutral Paper Pack
Film Strip Border Maker Cartridge 
(If you don't have the border maker you can purchase that HERE )
I used Cricut to cut out Hollywood but the CM ABC's would worked better http://www.creativememories.com/shop-all/decorative/stickers.html

Like my Facebook Scrapin' Jpegs 
Find me at Twitter #ScrapinJpegs #CandaceBouldin

Tell me what you think of it??

Tuesday, August 4, 2015

Back 2 School Time!

I wasn't going to share this on here but I did on another FB group and got tons of teachers that liked this idea to put up in their classroom, even though we did it for my daughter, who's going into 9th grade, binder cover. It was even discussed that you could cut it out of vinyl too. Wouldn't it be cute to put in a frame and hang up in classroom?

This project we used 5 star Mead notebook we got at Target. The cover insert was 13" x 8" We used 12 x 12 paper and cut 4" off, we then used the extra cut off to add to top making it 13". We used the Creative Memories Border Maker to make this white border, Heritage Makers (aka Our Memories For Life) punch the Scalloped shells made the cute pattern. Yes, you heard right the OMFL punches fits in the CM system and they are coming out with some cute new punches.
Hard to see but she adding bling to the center of each of the shell design.

The word "Schedule" was made using Cricut cartridge Calligraphy collection and "classes" we used Base Camp cartridge. The tiny writing of times and teacher my beautiful daughter hand wrote with white paint pen.  We were going to cut that out too but she was done doing letters. But I think it turned out cuter with her hand writing anyways.  We tried two different transfer tapes but it was ripping the paper.  We found putting letters through Xyron worked better because one you could reposition the letters and two it was tedious to glue each individual letter. We added more bling to all the dots of "i's". Finished it off with cute flowers on top.

Happy Creating and make it a great school year! 📚

CM Border Punch can be found at my website CM Border maker
OMFL Scallop punch cand be found at OMFL Scalloped Shell Punch

Punches coming this fall:
Bookmark this site or follow me for launch date http://www.heritagemakers.com/CandaceBouldin

Saturday, August 1, 2015

Get organized with CM Tool Organzier


I shared on my FB Page Scrapin' Jpegs with some examples of great uses for the new tool organizer  other than for the border maker. Overall dimensions are 15" x 9.5" x 4.5"


I was asked about the number of Cricut Cartridges it would hold?  
I measured a book and it's 7" long so you could get two rows of books/overlays side by side and put the cartridges below. 

The photo below shows you could get 14/16 books and overlays per side, totaling 28 to 32 cartridges. 


Thank you Mary Davenport for sharing a photo of her tool organizer and she writes "One section is 30 cartridges and 10 books and overlays in the other three sections. You probably get 5 more in if needed. In this example cartridges are numbered and overlay, and booklet to correspond with a page in a flexable notebook with copied the backs of cartridge to view at a glance."

I just love the flexibility of this product!  It retails for $39.50
http://www.creativememories.com/…/tools/tools-organizer.html
How will use the Tool Organizer?

New Creative Memories Border Maker = FUN!

Have you tried the border maker from Creative Memories?   I'm loving it and can't wait to get my hands on the newest punches the filmstrip,  bubble maker and stars. You can take a look at them on my Creative Memories website http://www.creativememories.com/shop-all/tools.html
I had a booth at a retreat and the ladies got to make this patrotic make n take using the border maker and cartridge the picket fence which comes with the system.
I pre cut out the statues of Liberty ahead of time using Cricut (used silver pen to draw lines to bring out details - could use white pen) and the blue strips that they weaved through the cut out areas of punch.  The stars were cut out with CM punch. The edges were frayed by using CM tearing tool. Use CM bold tip pen to "ink" the edges of torn paper.  What will you create with it?